Introduction
If you’re new to the Apple ecosystem and are looking to create an iCloud account, you’ve come to the right place. Whether you want to back up your data, sync your devices, or access Apple’s services like the App Store and iCloud Drive, setting up an iCloud account is essential. This step-by-step guide will help you create your very own iCloud account easily, even if you’re a complete beginner.
Table of Contents
What is an iCloud Account and Why Do You Need It?
An iCloud account is your gateway to all of Apple’s cloud-based services. From storing files and photos to synchronizing your apps, contacts, and calendars across devices, iCloud helps you stay connected. More importantly, it’s also your Apple ID, which you’ll use to sign in to all Apple services.
Benefits of Having an iCloud Account:
- Seamless data backup and restore – Automatically back up your photos, files, and app data.
- Sync across devices – Use your iCloud account to sync data across your iPhone, iPad, Mac, and even Windows devices.
- Access to Apple’s services – iCloud provides access to services like the App Store, iTunes, and Apple Music.
Step-by-Step Guide: How to Create an iCloud Account
Step 1: Open Settings on Your Apple Device
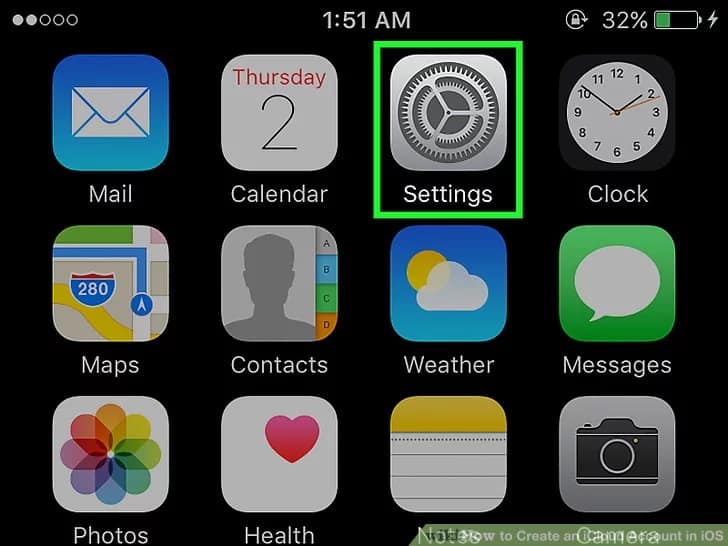
To create an iCloud account, start by opening the Settings app on your Apple device. This can be an iPhone, iPad, or iPod touch. If you’re using a Mac, you will access System Preferences instead of Settings.
Step 2: Tap on “Sign in to your iPhone” or “Sign in to your iPad”
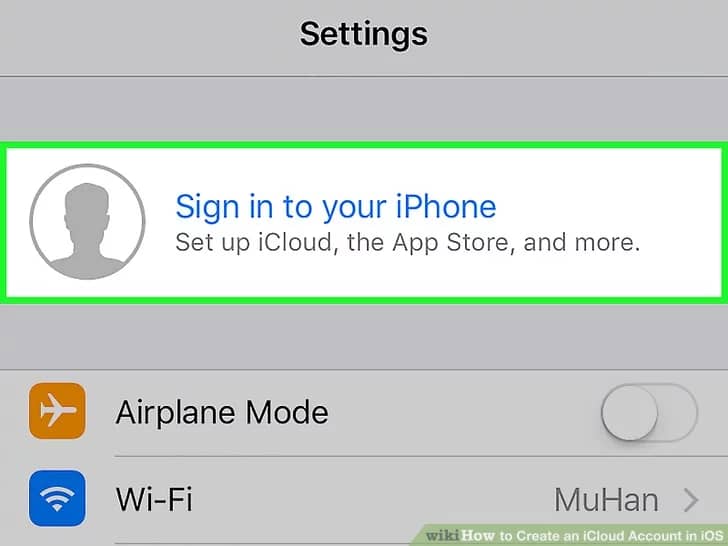
Once you’re in the Settings menu, you’ll see an option at the top labeled “Sign in to your [Device].” Tap on this to begin the process of creating your iCloud account.
Step 3: Tap on “Don’t have an Apple ID or forgot it?”
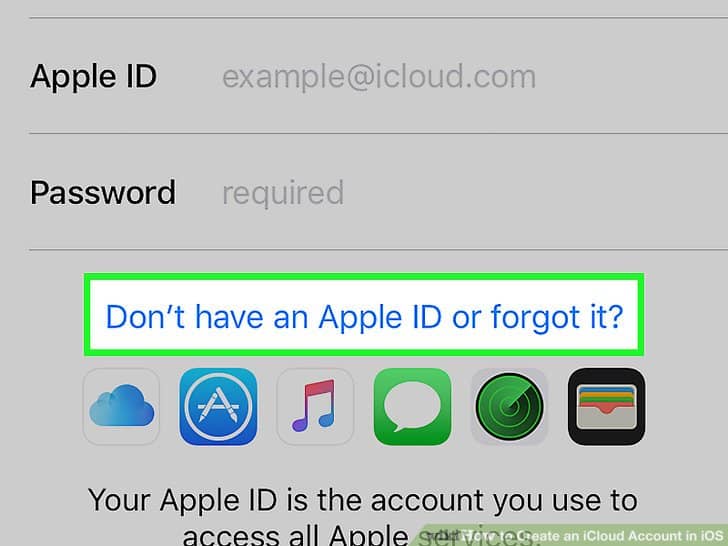
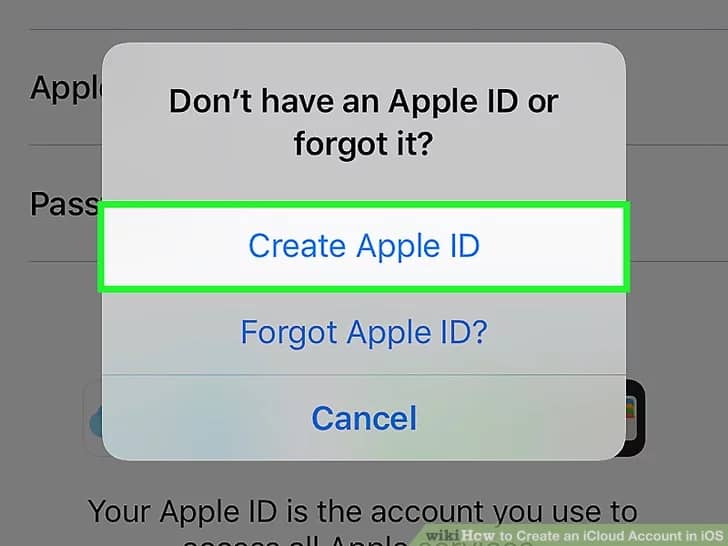
If you don’t have an existing Apple ID, don’t worry. Right below the sign-in fields, you’ll see the option “Don’t have an Apple ID or forgot it?” Click on this to proceed with creating a new iCloud account.
Step 4: Select “Create Apple ID”
Next, tap on Create Apple ID. This will open a form where you’ll need to enter some personal information to get started.
Step 5: Enter Your Personal Information
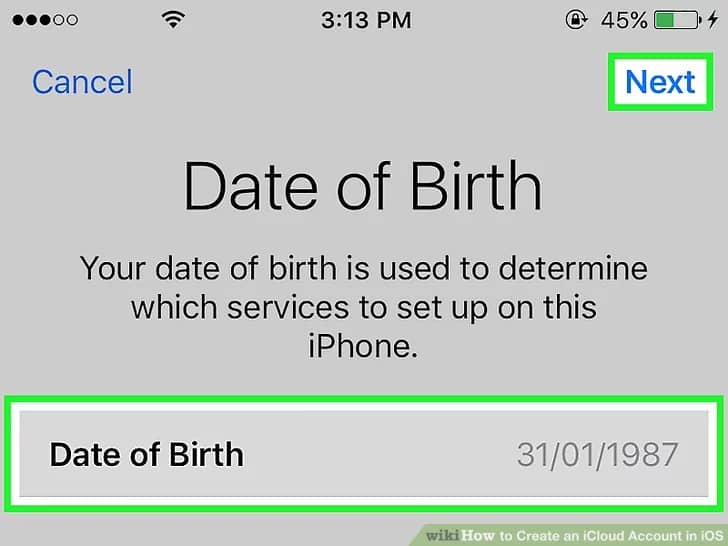
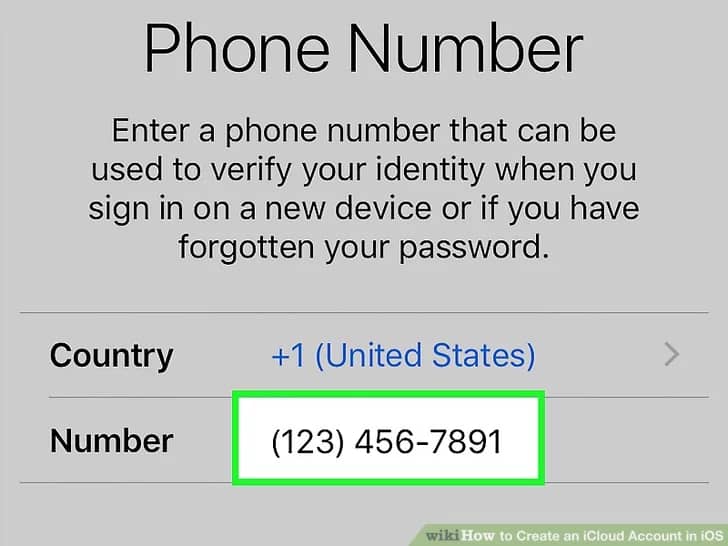
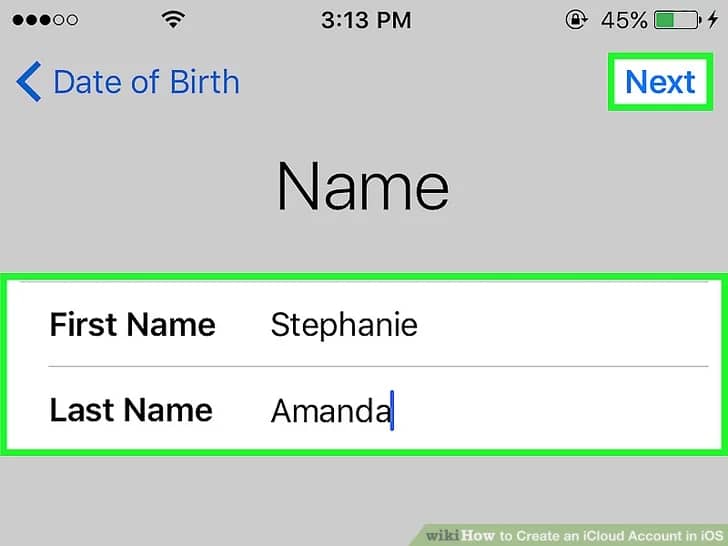
Here, you’ll need to fill out a form with your first and last name, as well as your birthdate. Enter your details accurately since this information will be associated with your iCloud account.
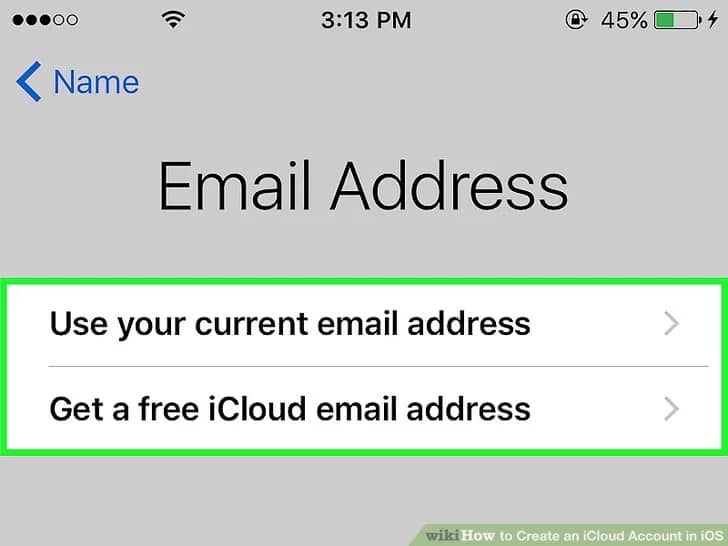
Step 6: Provide an Email Address or Create an iCloud Email
You can either use an existing email address or create a free iCloud email address. If you choose to create a new one, your email will look something like yourname@icloud.com.
Step 7: Create a Strong Password
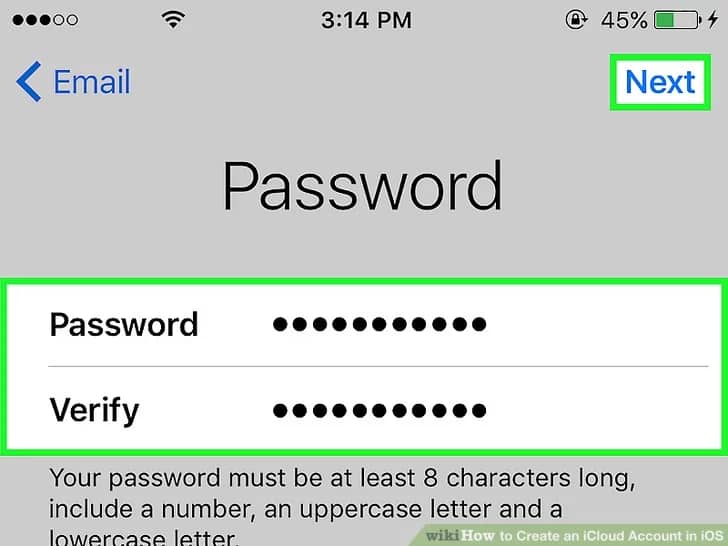
For security, you’ll need to create a strong password for your iCloud account. Make sure your password contains a mix of uppercase and lowercase letters, numbers, and special characters. This will protect your account from unauthorized access.
Step 8: Verify Your Email Address
If you used an existing email address, Apple will send a verification email to ensure that the email address belongs to you. Simply check your inbox and click the verification link.

Step 9: Set Up Security Questions
To further secure your account, you’ll need to set up a few security questions. These will be used to verify your identity if you ever lost or forgot your password, then you have these option to recover your password.
Step 10: Agree to Apple’s Terms and Conditions
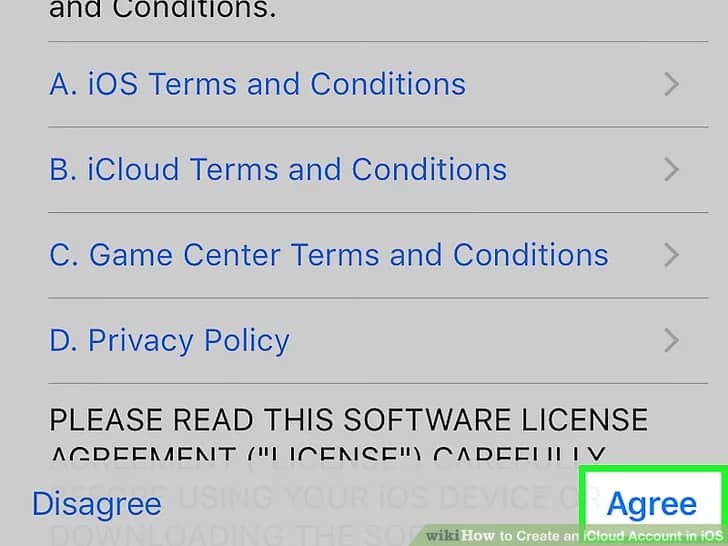
Once you’ve filled in all the necessary information, Apple will ask you to read and agree to their Terms and Conditions. Make sure to go through them and then tap Agree to proceed.
Step 11: Enable Two-Factor Authentication
For an extra layer of security, Apple will prompt you to enable Two-Factor Authentication. This feature ensures that only you can access your iCloud account by requiring a second form of identification (like a code sent to your phone) whenever you sign in.
Step 12: Complete Setup
After completing all the previous steps, your iCloud account will be ready for use. You’ll be signed in automatically, and your new Apple ID will be linked to iCloud services.
Common Issues and How to Resolve Them
1. Verification Email Not Received
If you don’t receive your verification email, check your spam or junk folder. Alternatively, you can resend the verification email by going back to Settings > iCloud and selecting Resend Verification Email.
2. Password Strength Issues
If Apple indicates that your password is not strong enough, try adding more unique characters or numbers. Ensure that your password is at least 8 characters long and includes a combination of letters, numbers, and symbols.
Conclusion
Creating an iCloud account is simple when you follow the right steps. With your new iCloud account, you’ll gain access to Apple’s world of services, allowing you to backup your data, sync devices, and enjoy everything the Apple ecosystem has to offer. Make sure to secure your account with a strong password and enable two-factor authentication for additional security.
Now that you’re all set, welcome to the world of iCloud and Apple!
How to Access and Use Your iCloud Account
Once your iCloud account is set up, it’s time to take advantage of the various features it offers. Here’s how you can access and use your iCloud account on different devices:
Accessing iCloud on Your iPhone, iPad, or iPod Touch
After setting up your iCloud account, it will automatically sync with your Apple device. Here’s how you can access iCloud services:
- Go to Settings: Open the Settings app.
- Tap on Your Name: At the top of the Settings menu, tap on your name, which is linked to your Apple ID.
- Select iCloud: Scroll down and tap on “iCloud.” You’ll see a list of services such as Photos, Contacts, Calendars, and more that you can enable or disable according to your preferences.
Accessing iCloud on a Mac
If you’re using a Mac, you can also access iCloud directly from your system. Here’s how:
- Open System Preferences: Click on the Apple logo in the top-left corner of your screen, then select System Preferences.
- Sign in to iCloud: Click on Apple ID, then sign in using the iCloud account you just created.
- Manage iCloud Services: Once signed in, you can enable or disable various iCloud services like iCloud Drive, Photos, and Find My Mac.
Accessing iCloud on a Windows PC
Apple has made it possible to access iCloud from a Windows computer, allowing you to sync data between your Apple and non-Apple devices. Here’s how you can use iCloud on Windows:
- Download iCloud for Windows: Go to Apple’s website and download the iCloud for Windows App.
- Install and Sign In: Install the app and sign in using your iCloud account details.
- Choose Features to Sync: You’ll be able to select which features you want to sync, like Photos, iCloud Drive, Mail, and Contacts.
Accessing iCloud from a Web Browser
If you don’t have access to an Apple device or the iCloud app on Windows, you can still use iCloud through a web browser:
- Visit iCloud.com: Open any web browser and go to www.icloud.com.
- Sign in with Your iCloud Account: Enter your Apple ID and password to sign in.
- Access iCloud Features: From the web dashboard, you can access services like iCloud Drive, Photos, Mail, and Contacts.
Key iCloud Features You Should Know About
Now that you have an iCloud account, let’s explore some of the key features it offers:
1. iCloud Drive
iCloud Drive is Apple’s cloud storage service, allowing you to store documents, photos, and other files in the cloud. You can access your iCloud Drive from any device signed in to your iCloud account.
- How to Enable iCloud Drive: Go to Settings > iCloud > iCloud Drive and toggle it on.
- Using iCloud Drive on a Mac: Open Finder, and you’ll see “iCloud Drive” in the sidebar. From here, you can drag and drop files for storage.
2. iCloud Photos
iCloud Photos automatically stores your photos and videos in the cloud, making them accessible from all your devices.
- How to Enable iCloud Photos: Go to Settings > Photos > Toggle on iCloud Photos.
- Accessing iCloud Photos on the Web: Go to iCloud.com, sign in, and click on Photos to view, upload, or download images.
3. Find My iPhone
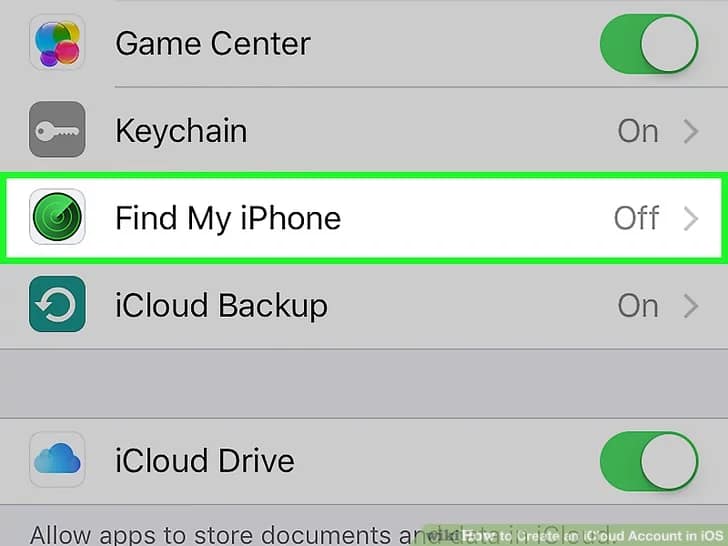
Find My iPhone helps you locate lost or stolen devices. Once activated, you can track your iPhone, iPad, or Mac from any device.
- How to Enable Find My iPhone: Go to Settings > iCloud > Find My iPhone and toggle it on.
- Using Find My iPhone on iCloud.com: Log in to iCloud.com and click on Find iPhone to locate your device.
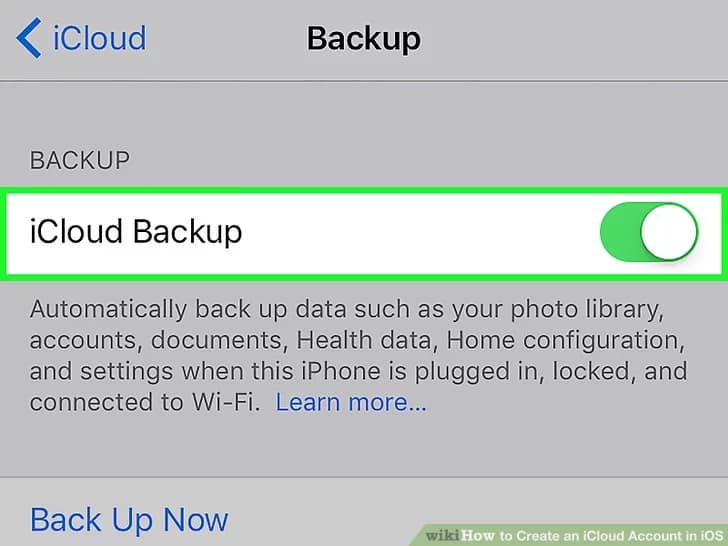
4. iCloud Backup
iCloud Backup allows you to automatically back up your iPhone or iPad, so your data is safe if something goes wrong.
- How to Enable iCloud Backup: Go to Settings > iCloud > iCloud Backup and toggle it on.
- Restoring from an iCloud Backup: If you ever need to restore your device, you can do so during the setup process of a new or reset device by selecting Restore from iCloud Backup.
Managing Your iCloud Storage
By default, Apple gives each user 5GB of free iCloud storage. However, if you find yourself running out of space, you can easily manage or upgrade your storage.
- Check Your Storage Usage: Go to Settings > iCloud > Manage Storage to see how much space you’re using.
- Upgrade iCloud Storage: If you need more storage, you can upgrade by going to Settings > iCloud > Manage Storage > Buy More Storage. Apple offers several plans, ranging from 50GB to 2TB.
Tips to Keep Your iCloud Account Secure
With so much of your data stored in iCloud, it’s important to ensure your account is secure. Here are some tips to help you:
- Use a Strong Password: Ensure your iCloud account password is complex and not easily guessable. Avoid using the same password across multiple Services.
- Enable Two-Factor Authentication: This feature adds an extra layer of security by requiring a verification code whenever you sign in from a new device.
- Regularly Review Your Devices: From your iCloud account settings, you can see all the devices currently signed in with your Apple ID. If you notice an unfamiliar device, sign out of it remotely.
Troubleshooting Common iCloud Issues
Despite its many benefits, iCloud can sometimes encounter problems. Here’s how to solve a few common issues:
1. Cannot Sign in to iCloud
If you’re having trouble signing into iCloud, check the following:
Solution:
- Ensure your device is connected to the internet.
- Double-check your Apple ID and password.
- Restart your device and try again.
2. iCloud Storage Full
If you’re getting alerts that your iCloud storage is full, consider the following solutions:
Solution:
- Delete unnecessary files, backups, or apps taking up space.
- Use Optimize iPhone Storage in Photos settings, which stores only the most recent photos on your device and moves the rest to the cloud.
- Upgrade to a higher iCloud storage plan.
3. iCloud Not Syncing Across Devices
If your data isn’t syncing across your Apple devices, it could be due to several reasons, such as an interrupted internet connection or issues with your iCloud settings.
Solution:
- Ensure all devices are connected to the internet.
- Make sure you are signed in to the same iCloud account on all devices.
- Go to Settings > iCloud and toggle off and on the services that aren’t syncing (e.g., Contacts, Calendars, etc.).
4. iCloud Backup Failing
If you notice that your iCloud backups are failing or not completing, you may be out of storage or experiencing a connection problem.
Solution:
- Ensure your device is connected to a stable Wi-Fi network.
- Check if you have enough iCloud storage. If not, you may need to free up space or upgrade your storage plan.
- Restart your device and try backing up again.
5. Unable to Access iCloud on Windows
If you’re having trouble accessing iCloud through the iCloud for Windows app, it may be related to an issue with the app installation or your login credentials.
Solution:
- Uninstall and reinstall the iCloud for Windows app.
- Ensure you’re using the correct Apple ID and password.
- Update your Windows operating system to the latest version.
Conclusion: Mastering iCloud for a Seamless Experience
Now that you’ve followed this complete guide on creating, managing, and troubleshooting your iCloud account, you should feel confident using it to enhance your Apple experience. iCloud offers a wide array of features, from backing up your data to seamlessly syncing your photos, documents, and other important files across all your Apple devices.
By mastering iCloud’s capabilities, you’ll enjoy the convenience of having all your important information at your fingertips, no matter which Apple device you’re using. Whether you’re storing photos, working on collaborative documents, or securing your devices, iCloud is the gateway to a truly connected digital life.
Take full advantage of what iCloud has to offer, and enjoy the peace of mind that comes with having your data backed up and easily accessible whenever you need it. Welcome to the Apple ecosystem!
Best Practices for Using iCloud
Here are some tips to help you make the most of your iCloud account:
1. Regularly Back Up Your Devices
Ensure that your iPhone, iPad, or Mac is regularly backing up to iCloud. This will allow you to restore your device quickly if something goes wrong, such as data loss or the need to set up a new device. Go to Settings > iCloud > iCloud Backup, and toggle it on to enable automatic backups.

2. Optimize Storage on Your Devices
If you’re running out of space on your device, enable the Optimize iPhone Storage feature for photos. This will keep full-resolution images in iCloud while storing optimized, smaller versions on your device. You can still access the full-quality versions at any time through iCloud.
3. Regularly Manage iCloud Storage
Regularly check your iCloud storage to make sure you are not wasting space on unused files, outdated backups, or large attachments. Freeing up space can prevent you from needing to upgrade your plan unnecessarily.
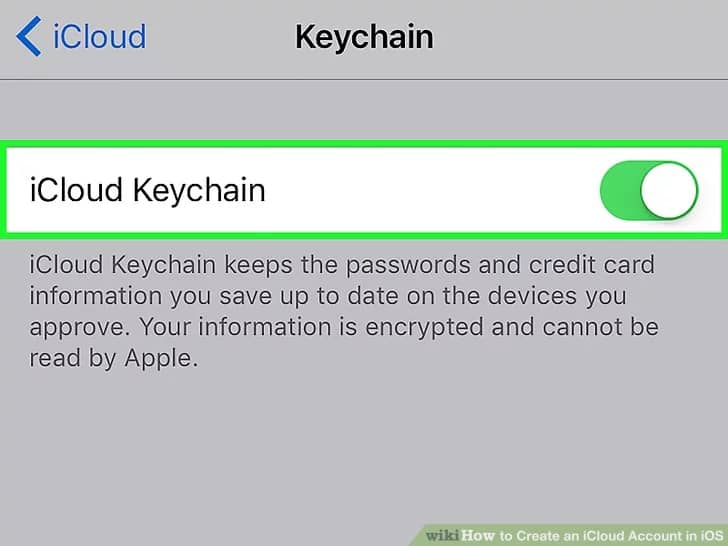
4. Use iCloud Keychain for Password Management
iCloud Keychain securely stores and auto-fills passwords, payment information, and Wi-Fi passwords across all your Apple devices. You can enable it by going to Settings > iCloud > Keychain. This can help you manage your passwords securely and avoid the hassle of remembering multiple logins.
5. Sync Your Apps and Data
Make sure you’re syncing important apps and data across devices. You can manage which apps are syncing to iCloud by going to Settings > [Your Name] > iCloud. Here, you can toggle on or off the apps you want to sync, like Mail, Contacts, Calendars, and Notes.
6. Use iCloud Drive for Document Management
If you frequently work with documents on your Mac, iPad, or iPhone, iCloud Drive can be a lifesaver. Store all your files in iCloud Drive, and access them from any of your devices or through iCloud.com. It’s a great way to ensure that your important documents are always within reach.
Final Thoughts
By following this comprehensive guide, you now have everything you need to set up and make the most of your iCloud account. Whether you’re using it for backups, document storage, photo syncing, or sharing data with family, iCloud is a powerful tool that simplifies your digital life across all your Apple devices.
Remember, setting up an iCloud account isn’t just about storage—it’s about creating a seamless, integrated experience with your Apple ecosystem. Make sure to take full advantage of the cloud services Apple offers, and enjoy the peace of mind that comes with automatic backups, secure data storage, and easy access to all your files.
Now that you’ve learned how to create, use, and secure your iCloud account, you’re ready to unlock the full potential of the Apple ecosystem. Happy cloud computing!
Frequently Asked Questions (FAQs) About iCloud Accounts
As you start using your iCloud account, you may have some questions about how to get the most out of its features. Here are some commonly asked questions and their answers:
1. Can I Use iCloud on Non-Apple Devices?
Yes! While iCloud is designed to work seamlessly with Apple devices, you can also access your iCloud data on non-Apple devices. For instance, you can download the iCloud for Windows app to sync files between your iCloud account and your Windows PC. Alternatively, you can access iCloud services through a web browser at iCloud.com, which works on both Windows and Android devices.
2. Is My Data Safe in iCloud?
Yes, Apple places a high priority on the security and privacy of your data. All iCloud data is encrypted both in transit and on Apple’s servers, ensuring it is secure. For added protection, you should enable Two-Factor Authentication to make sure that only authorized devices can access your account.
3. What Happens If I Forget My iCloud Password?
If you forget your iCloud password, you can easily reset it using the Forgot Apple ID or Password option on the sign-in page. You will be prompted to verify your identity by answering security questions or through your email. Once verified, you can create a new password.
4. Can I Share My iCloud Storage with Family Members?
Yes, you can share your iCloud storage plan with family members using Family Sharing. If you have an upgraded iCloud plan (50GB or more), you can invite up to five family members to share the storage. Each member still keeps their own private files and data, but you share the storage space. Go to Settings > [Your Name] > Family Sharing to set it up.
5. What Happens When I Reach My iCloud Storage Limit?
If you reach the storage limit for your iCloud account, your devices will no longer back up to iCloud automatically, and you may not be able to upload new photos, videos, or files. To resolve this, you can either:
1. Free up space by deleting unnecessary files, old backups, or large attachments.
2. Upgrade your iCloud storage plan by going to Settings > [Your Name] > iCloud > Manage Storage > Change Storage Plan.
6. Can I Downgrade My iCloud Storage Plan?
Yes, if you find that you no longer need as much storage, you can downgrade your plan at any time. Go to Settings > [Your Name] > iCloud > Manage Storage > Change Storage Plan and select a lower-tier plan. Keep in mind that if your stored data exceeds the new plan’s capacity, you will need to delete or offload some files before the downgrade.
7. How Do I Sign Out of iCloud on a Device?
To sign out of iCloud on any device, follow these steps:
1. On iPhone/iPad: Go to Settings, tap your name at the top, scroll down, and select Sign Out.
2. On Mac: Go to System Preferences, click on Apple ID, and select Overview, then click Sign Out.
3. On Windows: Open iCloud for Windows, click Sign Out.
If you want to know more about How Make money without Investment Then Click Here


